Battery switch on travel trailer function is key to managing your RV’s power. Understanding how to use this often-overlooked component can prevent frustrating power outages and extend the life of your batteries. This guide breaks down everything you need to know, from the different types of switches and their wiring to troubleshooting common problems and safety precautions. We’ll even cover upgrading to a more advanced system for improved power management.
We’ll explore the various types of battery switches (1-2-both, 1-2-off, etc.), their wiring diagrams, and step-by-step installation instructions. We’ll also delve into how to use the switch to manage your house and chassis batteries effectively, preventing common issues like overcharging and battery drain. Plus, we’ll provide practical troubleshooting tips and a safety checklist to keep you and your RV safe.
Understanding Battery Switch Functionality in Travel Trailers
A battery switch is a crucial component in a travel trailer’s electrical system, allowing you to manage the power flow between your trailer’s batteries and various electrical appliances. Understanding its function and proper usage is essential for maintaining your RV’s power and preventing potential issues.Battery switches in travel trailers serve the primary purpose of isolating and controlling the flow of power from your trailer batteries to the various electrical systems within your RV.
This allows you to select which battery (or batteries) power your appliances and accessories, preventing accidental discharge or draining of one battery while the other remains charged. It also provides a safe method for disconnecting all batteries from the trailer’s electrical system for maintenance or storage.
Types of Battery Switches
Several types of battery switches are commonly used in travel trailers, each offering different levels of control. The most common are the 1-2-Both switches and the 1-2-Off switches. A 1-2-Both switch allows you to select either battery 1, battery 2, or both batteries to power your trailer’s systems. A 1-2-Off switch offers the same battery selection options but also includes an “off” position, completely disconnecting both batteries from the trailer’s electrical system.
Other less common types may offer more complex switching arrangements, including those for solar charging systems or multiple battery banks.
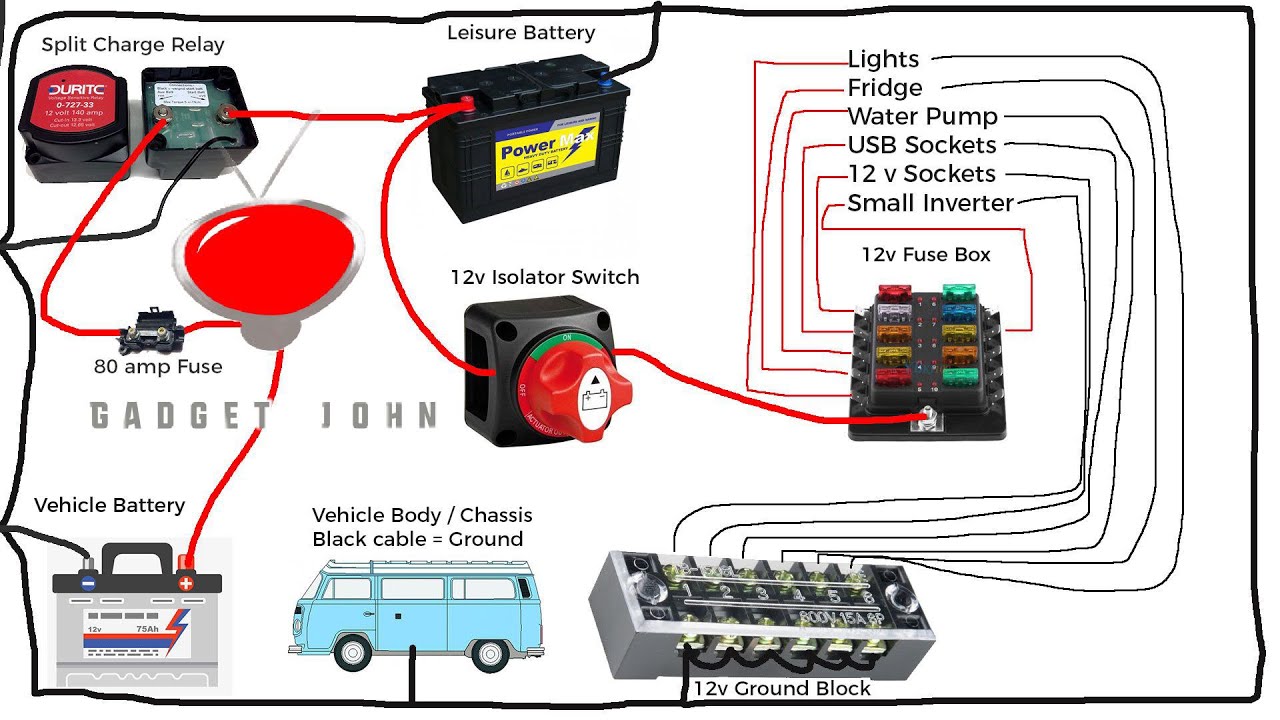
Wiring Diagram of a Typical Battery Switch Setup
A typical battery switch setup involves two batteries connected to the switch, and then the switch’s output wired to the trailer’s electrical distribution panel. Imagine a simple diagram: Two batteries (Battery 1 and Battery 2) each have a heavy-gauge wire running from their positive (+) terminals to the battery switch. Similarly, two heavy-gauge wires run from the negative (-) terminals of each battery directly to the chassis or a common ground point.
The battery switch itself has three or four terminals (depending on the type of switch) – one for each battery’s positive connection and one for the output to the trailer’s positive bus bar. A fourth terminal is present on 1-2-Off switches for the off position. From the positive bus bar, appropriately sized wiring branches out to power the various components in your trailer.
Proper grounding is critical for safety and proper system function.
Installing a Battery Switch
Installing a battery switch requires some basic electrical knowledge and the use of appropriate tools. Always disconnect the negative terminals of both batteries before starting any wiring work.
- Choose the Right Location: Select a location that provides easy access to the switch while keeping it protected from the elements.
- Mount the Switch: Securely mount the battery switch to a suitable surface using appropriate fasteners.
- Connect the Batteries: Connect heavy-gauge wires from the positive (+) terminals of each battery to the corresponding terminals on the switch. Ensure connections are tight and secure, using appropriate connectors and terminal ends.
- Connect the Output: Connect a heavy-gauge wire from the output terminal of the switch to the positive bus bar of your trailer’s electrical panel.
- Grounding: Connect the negative (-) terminals of both batteries directly to the trailer’s chassis or a common ground point using heavy-gauge wires. Ensure a clean and secure connection.
- Test the System: After completing the installation, carefully test the switch in each position (1, 2, Both, Off) to ensure proper functionality and that the power flows correctly to the trailer’s circuits.
Remember to always consult your trailer’s wiring diagram and use appropriate safety precautions when working with electrical systems. Incorrect wiring can lead to damage to your equipment or even create a fire hazard.
Managing Power Sources with the Battery Switch
Your travel trailer’s battery switch is your command center for managing power from both your house batteries (powering interior lights, appliances, etc.) and your chassis battery (powering engine starting, brakes, etc.). Understanding how to use it correctly is crucial for preventing costly battery drain and avoiding potential electrical issues.Understanding the difference between how the switch affects your house and chassis batteries is key to safe and efficient power management.
Improper use can lead to dead batteries and even damage to your RV’s electrical system.
House Battery versus Chassis Battery Control
The battery switch typically controls the flow of power to your house batteries, which are separate from the battery used to start your tow vehicle. When the switch is in the “on” position for the house batteries, you’re allowing power to flow from the house batteries to your RV’s interior systems. Conversely, the chassis battery is almost always independent of this switch, ensuring that your tow vehicle remains operational regardless of the switch’s position.
Turning the switch off isolates the house batteries, preventing them from draining. Many switches offer a “both” position, connecting both the house and chassis batteries, which is useful for charging the house batteries from the vehicle’s alternator while driving.
Implications of Different Switch Positions
Leaving the battery switch in the “on” position while your trailer is parked for extended periods can drain your house batteries, potentially leaving you without power when you need it. Leaving it in the “off” position prevents this drain, but means you won’t have power to any house systems. The “both” position, while helpful for charging, should be used judiciously.
If there’s a problem with the charging system, it could potentially overcharge the house batteries while connected to the chassis battery.
Best Practices for Preventing Battery Drain
Always turn the battery switch to the “off” position when your trailer is not in use for extended periods. This prevents parasitic drain from things like clocks or low-level current draws. Consider using a battery disconnect switch as a secondary safeguard. Regularly check your battery levels using a multimeter to ensure they are maintaining a healthy charge. Before leaving your trailer for an extended period, disconnect any unnecessary appliances or electronics to minimize drain.
Potential Issues from Incorrect Battery Switch Usage
Incorrect use of the battery switch can lead to several problems. Leaving the “both” position engaged for prolonged periods without monitoring could lead to overcharging of the house batteries, potentially damaging them. Improper connections or attempting to manipulate the switch while the system is under load can result in short circuits, which can cause damage to the switch itself or even a fire.
Always ensure that the switch is turned off before making any connections or disconnections.
Troubleshooting Common Battery Switch Problems
Your travel trailer’s battery switch is a critical component, and when it malfunctions, it can leave you stranded without power. Understanding the common problems and how to troubleshoot them is essential for maintaining your RV’s electrical system. This section will guide you through identifying symptoms, diagnosing issues, and implementing solutions for a non-functional battery switch.
Common Symptoms of a Faulty Battery Switch
A malfunctioning battery switch often presents itself through several noticeable symptoms. These can range from complete power failure to intermittent power disruptions, affecting both your house batteries and the ability to charge them. Recognizing these symptoms early can prevent more significant problems down the line.
- Complete lack of power to the trailer’s 12V system, regardless of the switch position.
- Intermittent power loss – power comes and goes erratically.
- Inability to charge the house batteries, even when connected to shore power or a generator.
- Unusual noises or smells emanating from the battery switch itself (clicking, buzzing, burning).
- The switch feels unusually loose or stiff, indicating potential internal damage.
Troubleshooting Steps for a Non-Functional Battery Switch
Systematic troubleshooting is key to identifying the root cause of your battery switch problem. Start with the simplest checks and progress to more complex diagnostics. Remember to always disconnect the negative battery terminal before working on any electrical components.
- Visual Inspection: Begin by carefully inspecting the switch for any obvious signs of damage, such as loose wires, corrosion, or physical breakage. Look for any burn marks or melted plastic which indicate overheating.
- Check Connections: Examine all wire connections to the switch, ensuring they are securely fastened and free from corrosion. Clean any corroded terminals with a wire brush and apply a corrosion inhibitor.
- Test Switch Functionality: With the negative battery terminal disconnected, use a multimeter to test the continuity of the switch in different positions. A properly functioning switch should show continuity only when in the “on” position for the respective circuits.
- Test Battery Voltage: Check the voltage of your house batteries using a multimeter. Low voltage could indicate a charging problem, separate from the switch itself, and needs further investigation of the charging system.
- Check Fuses and Breakers: Inspect any fuses or circuit breakers associated with the battery switch and the charging system. Replace any blown fuses or reset tripped breakers.
Potential Solutions for Resolving Common Battery Switch Malfunctions
Depending on the diagnosis, solutions can range from simple repairs to complete switch replacement.
- Tighten Loose Connections: If loose connections are found, simply tightening them may resolve the issue.
- Clean Corroded Terminals: Cleaning corroded terminals with a wire brush and applying dielectric grease will restore conductivity.
- Replace Blown Fuses: Replacing blown fuses with fuses of the correct amperage rating is crucial.
- Replace the Battery Switch: If the switch itself is faulty, it will need to be replaced. This usually involves disconnecting the wires, removing the old switch, and installing a new one, ensuring correct wiring according to the manufacturer’s instructions.
Troubleshooting Flowchart for a Non-Functional Battery Switch
The following flowchart illustrates a step-by-step approach to troubleshooting:Imagine a flowchart with these steps:
1. Start
Is there power to the trailer?
So, you’re planning a trip? Awesome! Before you pack your bags, remember travel insurance is key. Check out this resource for more info on Aon travel insurance options. It’s smart to compare different plans, and reading reviews is super helpful. For example, you might find insightful commentary on Aon travel insurance to help you decide what coverage best suits your needs and budget.
Don’t leave home without it!
Yes
End (Problem elsewhere)
No
So, you’re planning a trip? Awesome! Don’t forget travel insurance! Check out Aon travel insurance for comprehensive coverage. They offer various plans, so you can find one that fits your needs and budget. For detailed reviews and comparisons, head over to Aon travel insurance commentary section to see what other travelers have to say.
Getting insured is a smart move – peace of mind is priceless, especially when you’re exploring new places!
Proceed to step 2
2. Visual Inspection
Are there any obvious signs of damage to the switch or wiring?
Yes
Repair or replace damaged components. Return to Step 1.
No
Proceed to step 3
3. Check Connections
Are all connections secure and corrosion-free?
Yes
Proceed to step 4.
No
Clean or repair connections. Return to Step 1.
4. Test Switch Continuity
Does the switch show continuity in the correct positions?
Yes
Proceed to step 5.
No
Replace the switch. Return to Step 1.
5. Test Battery Voltage and Check Fuses/Breakers
Are the batteries charged, and are all fuses and breakers functional?
Yes
End (Problem elsewhere)
No
Address battery charging or fuse/breaker issues. Return to Step 1.
Battery Switch and its Interaction with Other Systems
The battery switch in your travel trailer isn’t just a simple on/off switch; it’s a crucial component that manages the flow of power between your trailer’s batteries and various electrical systems. Understanding how it interacts with other systems is vital for efficient power management and preventing potential problems. This section will explore the relationships between the battery switch and your trailer’s charging system, appliances, and solar panels (if equipped).
Battery Switch and the Trailer’s Charging System
Your travel trailer’s charging system, typically comprising a converter and potentially a generator, replenishes your batteries. The battery switch plays a vital role in this process. When the switch is in the “on” position, the charging system can effectively charge the batteries. Conversely, if the switch is off, the charging system will not charge the batteries, regardless of whether the charging system is activated or not.
This is because the switch acts as a gatekeeper, controlling the electrical pathway. This is important to remember if you’re storing your trailer for extended periods. Leaving the switch on while the trailer is disconnected from shore power or a generator could drain your batteries.
Battery Switch and Appliance Operation
The battery switch directly impacts the operation of your trailer’s appliances and devices. With the switch in the “off” position, all devices running off the house batteries are completely deactivated. In the “on” position, power flows freely from the batteries to the appliances. However, it’s crucial to remember that some appliances might also draw power from the shore power or generator regardless of the battery switch position, depending on their wiring configuration.
For example, an appliance plugged directly into a shore power outlet might still function even with the battery switch off.
Battery Switch and Solar Panel Charging System
If your travel trailer is equipped with solar panels, the interaction with the battery switch is similar to the charging system. The solar panels charge the batteries, and the battery switch controls whether this charge can reach the batteries. With the switch off, solar energy won’t charge the batteries. Many solar charge controllers have a built-in mechanism to prevent overcharging, but the battery switch provides an additional layer of control and safety.
It allows you to disconnect the solar panels from the batteries when needed, such as during long-term storage.
Power Draw of Appliances in Different Battery Switch Positions
The following table illustrates the power consumption of various appliances in different battery switch positions. Note that these values are approximate and can vary depending on the specific appliance and its usage. “N/A” indicates the appliance’s function is independent of the battery switch.
| Appliance | Battery Switch: Off | Battery Switch: On | Shore Power/Generator |
|---|---|---|---|
| Interior Lights (LED) | Off | On (Low Power Draw) | N/A |
| Refrigerator (12V) | Off | On (Moderate Power Draw) | On (If Plugged In) |
| Air Conditioner | Off | Off | On (High Power Draw) |
| Microwave | Off | Off | On (High Power Draw) |
Safety Precautions and Maintenance: Battery Switch On Travel Trailer Function

Working with your travel trailer’s battery system involves handling potentially dangerous electrical components. Understanding and following safety procedures is crucial to prevent injury and damage to your equipment. Proper maintenance ensures the longevity and reliable operation of your battery switch and associated wiring.
Always disconnect the negative (-) battery terminal first before working on any part of the battery system. This minimizes the risk of accidental shorts and sparks. Remember that lead-acid batteries produce hydrogen gas, which is highly flammable. Ensure adequate ventilation when working near batteries, and avoid sparks or open flames.
Safety Precautions When Working with the Battery Switch
Before beginning any work on your battery switch, always disconnect the negative battery terminal. This is the single most important safety step. Wear appropriate safety glasses to protect your eyes from potential splashes of battery acid or flying debris. Use insulated tools to prevent electrical shocks. Never touch the battery terminals or wires while the system is energized.
If you are unsure about any aspect of the process, consult a qualified RV technician.
Battery Switch and Related Component Maintenance Schedule
Regular maintenance is essential to ensure the reliable operation of your battery switch and related components. A consistent schedule will help prevent unexpected issues and extend the lifespan of your system.
- Monthly Inspection: Visually inspect all connections for corrosion, loose wires, or damage. Tighten any loose connections.
- Yearly Inspection: Thoroughly clean the battery terminals and connections with a wire brush and baking soda solution. Apply a corrosion inhibitor to prevent future corrosion. Inspect the battery switch itself for any signs of damage or wear.
- Every Two Years: Consider having a qualified RV technician inspect the entire battery system, including the switch, wiring, and batteries, for any potential problems.
Battery Switch Inspection Checklist
A regular inspection using a checklist helps ensure you don’t miss any critical details. This systematic approach contributes to a safer and more reliable system.
- Visually inspect the battery switch for any signs of damage, such as cracks, burns, or loose parts.
- Check all wire connections for corrosion, looseness, or damage. Pay close attention to the positive (+) and negative (-) terminals.
- Verify that the switch operates smoothly and correctly switches between the different positions (e.g., battery, shore power, both).
- Inspect the surrounding area for any signs of overheating or damage to nearby components.
- Check the battery cables for any signs of wear, fraying, or damage. Ensure that the cable clamps are securely fastened.
Safely Disconnecting and Reconnecting the Battery Switch
Proper disconnection and reconnection procedures are crucial for safety and to avoid damage to your system. Follow these steps meticulously.
- Turn off all appliances and electronics connected to the battery system.
- Disconnect the negative (-) battery terminal first using a wrench or insulated pliers. This prevents accidental shorts.
- Disconnect the positive (+) battery terminal.
- Once the work is complete, reconnect the positive (+) terminal first.
- Reconnect the negative (-) terminal last.
- Turn on appliances and electronics to verify that the system is functioning correctly.
Battery Switch Selection and Upgrade Options
Choosing the right battery switch for your travel trailer is crucial for managing your power sources effectively and safely. A well-selected switch ensures reliable power distribution, protects your batteries, and simplifies your electrical system. This section will guide you through the process of selecting and potentially upgrading your battery switch.Upgrading your battery switch can offer significant advantages, from improved safety features to enhanced control over your power system.
However, it’s important to understand the various options available and weigh the costs and benefits before making a decision. Factors such as your trailer’s electrical needs, budget, and technical expertise will influence your choice.
Types of Battery Switches
Several types of battery switches exist, each with its own pros and cons. The most common are manual switches, remote switches, and automatic switching systems. Manual switches are the simplest and most affordable, requiring physical operation to change the power source. Remote switches offer convenience, allowing you to control the switch from inside your trailer. Automatic switching systems, often incorporating features like low-voltage disconnect, provide the highest level of automation and safety.
Examples of brands include Blue Sea Systems, Progressive Dynamics, and WFCO. Each brand offers various models with different amperage ratings and features. For instance, Blue Sea Systems offers a wide range of manual and remote switches, while Progressive Dynamics focuses on more advanced systems with charge controllers and other integrated functions. WFCO is known for their affordability and suitability for basic setups.
Factors to Consider When Choosing a Battery Switch
Several factors should influence your battery switch selection. The first is the amperage rating. This should be higher than the maximum current draw of your trailer’s appliances. A higher amperage rating provides a safety margin and prevents overheating. Next, consider the type of switch—manual, remote, or automatic—based on your preferences and technical capabilities.
The number of batteries you have also determines the switch type; a dual-battery system requires a switch that can handle two sources. Finally, the physical size and mounting style of the switch should be compatible with your trailer’s existing electrical system.
Benefits and Drawbacks of Upgrading
Upgrading to a more advanced battery switch system offers several benefits. Improved safety features, such as low-voltage disconnect and overcurrent protection, prevent damage to your batteries and other components. Remote control adds convenience, allowing you to manage your power sources from inside the RV. Some advanced systems incorporate charge controllers and monitoring capabilities, offering better control over your battery’s charging and state of charge.
However, upgrading can be more expensive than simply replacing a basic switch. Installation may also require some technical expertise, and the increased complexity could potentially introduce new points of failure.
Features to Consider When Selecting a Battery Switch, Battery switch on travel trailer function
Before selecting a battery switch, consider these key features:
- Amperage Rating: Choose a switch with an amperage rating exceeding your trailer’s maximum current draw.
- Switch Type: Select a manual, remote, or automatic switch based on your needs and budget.
- Number of Batteries: Ensure the switch can handle the number of batteries in your system.
- Overcurrent Protection: Look for switches with built-in overcurrent protection to prevent damage.
- Low-Voltage Disconnect: This feature protects your batteries from deep discharge.
- Remote Control: Remote operation adds convenience.
- Mounting Style and Size: Ensure compatibility with your trailer’s electrical system.
- Warranty: A good warranty provides peace of mind.
Mastering your travel trailer’s battery switch is crucial for a smooth and enjoyable RV experience. By understanding its function, properly managing your power sources, and performing regular maintenance, you can prevent costly repairs and ensure your RV’s systems run smoothly. Remember to always prioritize safety when working with electrical systems, and don’t hesitate to consult a professional if you encounter any problems you can’t resolve.
Happy travels!
Q&A
What happens if I leave my battery switch in the “Both” position?
Leaving the switch in “Both” connects both your house and chassis batteries. This is fine for short periods, but prolonged use can drain your batteries faster if not charging properly.
Can I use a battery switch with a solar panel system?
Yes, but the wiring needs to be configured correctly. The solar panel charger should ideally charge the house batteries even if the battery switch is off to maintain a charge on those batteries.
How often should I inspect my battery switch?
At least once a year, or more frequently if you notice any unusual behavior, like flickering lights or weak battery performance. Check for corrosion, loose connections, and damage.
What size battery switch do I need?
The amperage rating of your battery switch should match or exceed the total amperage draw of your appliances and systems. Consult your RV’s specifications or a qualified electrician for the appropriate size.
